- Details
-
Created: Friday, 11 November 2011 15:12
-
Last Updated: Friday, 11 November 2011 15:12
-
Written by Super User
Please ensure you are using the latest version of RokNavMenu, available here.
To find all the parameters for Fusion Menu and Splitmenu, such as transitions, duration and sublevel position, go to:
- (J15) Extensions → Template Manager → rt_visage_j15 → Menu → Menu Control → Set Menu Type
- (J17) Extensions → Template Manager → rt_visage → Menu → Menu Control → Set Menu Type
Descriptions of each template parameter can be seen when you mouseover the label of each option.
Fusion Menu is a menu theme of the RokNavMenu extension, the addon that drives all RocketTheme template menus. It is primarily a javascript enhanced CSS dropdown menu, that combines standard suckerfish type functionality with animations, transitions and other advanced effects powered by Mootools.
- 1/2/3/4 Column Modes
- Custom Column Widths
- Custom Menu Width
- Menu Item Grouping
- Item Distribution Controls
- Animation Controls
- Transition Controls
- Duration/Delay Controls
- Opacity Controls
- Per Item Styling
- Inline Modules
- Inline Positions
- Menu Item Subtext
- Menu Item Icons
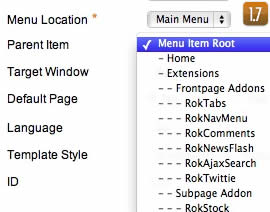
All Menu Items can be edited from Admin → Menu → Menu Name → Menu Item.
Basic Fusion Parameters
- Subtext is the option that allows you to insert additional text to the Menu Item Title. There is separate styling for this, making it useful for adding brief descriptions to menu items.
- Menu Icon is the option that allows you to insert an inline icon / image to the Menu Item.
Advanced Fusion Parameters: Columns
Menu Columns
Columns of Child Items allows you to determine how many columns the Fusion dropdowns are presented in. You can have anywhere between a single dropdown to a four column dropdown.
Item Distribution
Item Distribution allows you to control how the menu items are ordered in the dropdowns:
- Evenly: If there are 7 menu items in 3 columns, Fusion will allocate a 3,2,2 distribution - trying to equalize each dropdown.
- Order: If there are 7 menu items in 3 columns, Fusion will allocate a 3,3,1 distribution - maintaining the item ordering.
- Manually: Determine the exact distribution of items across all columns in the Manual Item Distribution field. For example, if there are 7 menu items in 3 columns, you can specify a 4,2,1 distribution.
NOTE: If your Columns of Child Items setting is configured to be 2 or more columns, you will need to manually set the column widths and distribution, as outlined below. The default is 180px which is too small for multiple columns.
Drop-Down Width (px)
Drop-Down Width (px) determines the total width of the dropdown, regardless of how many columns are shown. This option is to be used in conjunction with Column Widths (px)
Column Widths (px)
Column Widths (px) determines the width of each Column. Separate each width by a comma. The final column's width is determined automatically. This option is to be used in conjunction with Drop-Down Width (px)
Below are some example configurations:
- Drop-Down Width: 480px: 160,160. Fusion automatically calculates the final width as 160, so in practise, 160,160,160 is the actual distribution.
- Drop-Down Width: 600px: 160,160. Fusion automatically calculates the final width as 280, so in practise, 160,160,280 is the actual distribution.
Advanced Fusion Parameters: Groupings
What is Grouping?
Group Child Items changes the behaviour of child items in the dropdown menus, instead of creating a dropdown for the immediate sublevel, this option places them inline. See below for an illustrated example of the differences:
Configuration
NOTE: Grouping cannot be applied to root items, only child items.
Set Group Child Items to Yes to activate the mode. The sublevels well then appear below the parent menu item in a categorical type structure.
Advanced Fusion Parameters: Modules
Fusion is now capable of loading individual modules or entire module positions inside its dropdowns.
- Inline Modules: Set Child Item Type to Modules to load all modules setup on your Joomla site in a list. Select the module you wish to display in the dropdown.
- Inline Positions: Set Child Item Type to Modules Positions to load all module positions on your Joomla site in a list. Select the position you wish to display in the dropdown.
A static menu system that displays 1st and 2nd level items in the main horizontal menu and further children in the Sidebar.
- Subtext is the option that allows you to insert additional text to the Menu Item Title. There is separate styling for this, making it useful for adding brief descriptions to menu items.
Code Modification: Remove the Menu in the Title
(J15) Open /templates/rt_visage_j15/html/modules.php:
(J17) Open /templates/rt_visage/html/modules.php:
Change
<?php echo $menu_title_item->name.' '.JText::_('Menu'); ?>
To
<?php echo $menu_title_item->name; ?>
Or delete the entire line.
How to create Child / Sublevel menu items
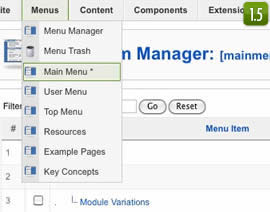
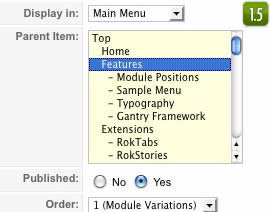
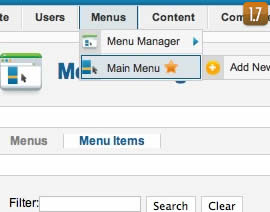
Go to Admin → Menu → A Menu → A Menu Item → Select a Parent Item, and it will appear as a child of it.
- Details
-
Created: Friday, 11 November 2011 15:12
-
Last Updated: Friday, 02 December 2011 00:01
-
Written by Super User
Note: The Bundle Template is only necessary if the Gantry Library is not installed at /components/com_gantry (J15) or /libraries/gantry (J17).
Step 1 - Installation
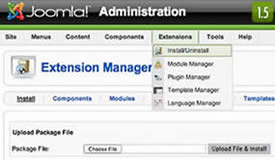
- (J15) Install from Admin → Extensions → Install/Uninstall → Choose File → Select file → Upload File & Install
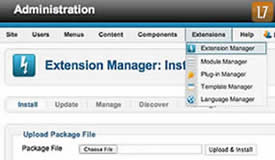
- (J17) Install from Admin → Extensions → Extensions Manager → Choose File → Select file → Upload File & Install
rt_visage_j15.tgz
rt_visage.zip
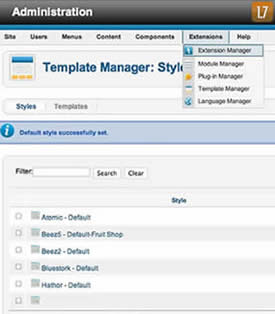
Step 1 - Template Default
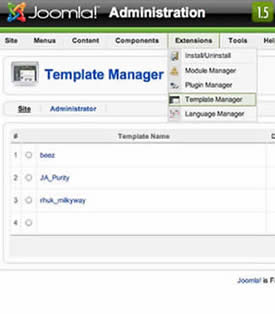
- (J15) Make the template default at Admin → Extensions → Template Manager → rt_visage_j15 → Default
- (J17) Make the template default at Admin → Extensions → Template Manager → rt_visage → Make Default
rt_visage_j15
rt_visage - Default Master
RocketLauncher Instructions
Note: All sample content images will be replaced with blank versions in the RocketLauncher version.
RocketLauncher is a customized Joomla install, that installs a replica of the demo onto your site - inclusive of sample data, content, extensions, the template and sample images.
We always recommend installing a RocketLauncher first to trial and understand the template more efficiently. It must be installed as new, and not over an existing Joomla install.
Step 1 - Upload
- Download the RocketLauncher
- Unzip
- Upload the created folder to your server
Note: You can upload all the files via FTP, or use cPanel or SSH to upload the zip and unzip directly onto the server. Enquire with your hosting provider.
Step 2 - Installation
- Go to www.yoursite.com/*folder name*
- Follow the Installation instructions
- Ensure you click Install Sample Data during installation
- (J15) Delete the /installation directory on your server
- (J17) Remove the installation folder in the Installation interface